The Node Creator is a wizard for creating Nodes via simple drag and drop from the NodeDefinitions defined in the aspect. It is a view of the Aspect.
When changes are made to the NodeDefinitions, remember to right click on the aspect -> Actions -> Refresh Cache to obtain the latest updates in the NodeCreator.
Presentation of the structure
The NodeCreator is broken down into 5 main parts:
- List of NodeDefinitions: displays all the NodeDefinitions of the aspect by assigning a color per graph.
- List of Orphan Nodes: displays all orphan Nodes, i.e. Nodes that do not have an isln relation with a TopNode and which have no parent.
- Creation Zone: This is where the Nodes are nested within each other. Only 3 levels of Nodes are visible.
- Node path: tree of the Nodes that includes the Node whose children are displayed in the Creation Zone (Root by default).
- Details of a Node: window for viewing and editing the properties of a Node.

List of NodeDefinitions
The NodeDefinitions of the aspect are displayed here. They are grouped by graph. A color is assigned for each graph in order to identify to which graph a Node is associated.
The relations between the NodeDefinitions and the Level property of each are read in order to define the creation rules, i.e., to define which Node can be created inside which Node.
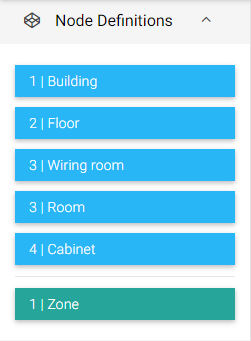
The example below contains 5 NodeDefinitions:
- Building is considered the Top NodeDefinition and is level 1.
- Floor has an isIn relation with Building. It is level 2.
- Technical Area and Room have an isIn relation with Floor and are level 3.
- Cabinet has an isIn relation with Room and is level 4.
- The first 4 NodeDefinitions form the first graph of this aspect
- Zone does not have an isln relation with another NodeDefinition. It therefore defines a second graph. It has a different color in the NodeCreator.
Wiresheet extract of a geographical aspect

Screenshot of the NodeDefinitions list of this aspect
List of Orphan Nodes
This panel contains all the Nodes of the aspect that do not have an isln ascendant relation with another Node and do not belong to a NodeDefinition located at level 1. They can be dragged and dropped into the Creation Zone for them to no longer be orphans.
Orphan Nodes can contain child Nodes. A child may also be dragged and dropped directly into the Creation Zone.
Example of the terrace which is a node of the NodeDefinition Floor (which is therefore level 2). A building can never be considered an Orphan Node because it is level 1.

Creation Zone
The Creation Zone is the main part of the NodeCreator. It allows you to nest Nodes into each other from drag and drop to create the desired tree.
Example of a building with several floors. The Ground Floor contains a Room (Restaurant) and a Technical Area (LVDB). The restaurant also has a cabinet (represented by the +1). Only 3 levels are available (this property can be changed in lexicon).

Node path
The node path shows the node tree viewed from the highest node. By default, all Nodes are contained in the Root element (which is not a Node).
When clicking on the Node Restaurant, the path is displayed until Restaurant and the NodeCreator represents all Nodes that are descendants of Restaurant: Cabinet 1 in our case.

Node Menu
Each Node has a dropdown menu with a list of commands:
- Edit: will open the Node Details (see below)
- Zoom-in: Get inside the Node and display its children
- Duplicate: Create the same Node in the common parent
- Make node orphaned: transform the Node as an orphaned (without any ascendant)
- Delete: Delete the Node from the parent (only effective if you save the view)
- Initialize: launch the initialize action (you don't need to save)

Node Details
The right panel of a Node allows you to view and edit the properties of a Node: its display name, its description, the NodeTag and the NodeRelation of the definition. To open the panel, just click on the Node (do not click on the name to avoid zooming in on it).
In the case where the Node is not in an {ok} state, its state is displayed
Level 1 Node edited in {ok} state in {fault} state


Settings
The NodeCreator has a settings page to configure different options. You can access it with the icon situated at the top right next to the save button. The settings you set are saved in your client interface, ie, if you're saving some settings in your Workplace, the changes will be saved only in your Workplace, not in your Web browser.

Show definitions on Nodes
The name of the definition will appear above the display name of the Node

